Redux tookitの使い方がいまひとつ身に付きにくかったんですね。
だから、備忘録として、Redux Toolkitを使っての状態管理のサンプルをブログ記事としました。
Redux Toolkitを使うときに当該記事を参考にして作っていくつもりです。
同じように当該記事を役に立ててくれたら嬉しいですね。
Reactプロジェクトの作り方
Reactプロジェクトの作り方は、こちらに記事にしてあります。
参考にしていただければと。

Redux toolkitのインストール
Reactのプロジェクトを作成する
npx create-react-app 「プロジェクト名」
だけでは、Redux toolkitはインストールされませんので、追加インストールが必要です。
ですから、Reactのプロジェクトを作成したディレクトリで、
npm install react-redux @reduxjs/toolkit
とコマンドを入力してください。
Redux Toolkitがインストールされます。
Redux Toolkitを使ったプロジェクト全体の状態管理するプロジェクトの作り方
アプリの仕様
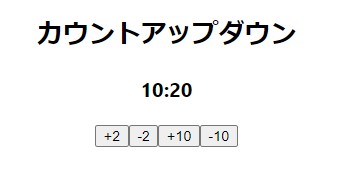
「+2」のボタンをクリックすると、左側のカウントには+2され、右のカウントには、+4される。
「-2」のボタンをクリックすると、左側のカウントには-2され、右のカウントには、-4される。
「+10」のボタンをクリックすると、左側のカウントには+10され、右のカウントには、+20される。
「-10」のボタンをクリックすると、左側のカウントには-10され、右のカウントには、-20される。
アプリには、ボタンに示された数字を+-するreducerとボタンに示された数字の2倍を+-するreducerが存在します。
このアプリの仕様ならば、一つのreducerで実現できるという「つっこみ」はご勘弁。
複数のreducerが存在するシンプルなアプリを作りたかったんです。
src配下のディレクトリ構造
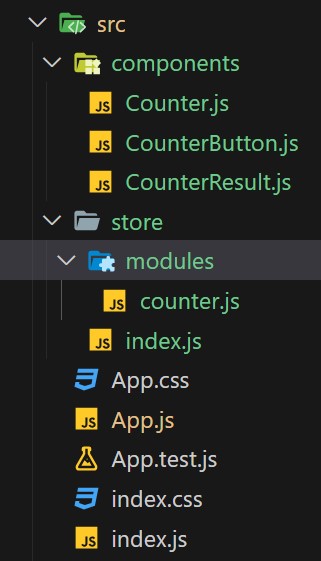
アプリのsrc配下は以上のように構成しています。
App.js
import { Provider } from 'react-redux';
import './App.css';
import store from "./store"
import Counter from './components/Counter';

function App() {
  return (
    <div className="App">
      <Provider store={store} >
        <Counter />
      </Provider>
    </div>
  );
}
App.jsでは、実際に動作するコンポーネントを <Provider store={store} ></Provider>で囲います。
「import store from “./store”」とimportしておいてください。
このようにimportすると、storeは、storeフォルダにあるindex.jsを参照しに行きます。
では、index.jsです。
./store/index.js
// ./store/index.js
import { configureStore } from "@reduxjs/toolkit";
import {counter, counter2} from "./modules/counter"

export default configureStore({
  reducer: {
    counter:counter.reducer,
    counter2:counter2.reducer,
  }
});
index.jsにreducer等を定義しますが、reducer別のファイルに定義して、index.jsでimportするとコードが見やすくなりますね。
ここでは、./store/modules/counter.jsにreducerを定義しています。
configureStore
Redux Toolkitから、configureStoreをimportします。
configureStoreはStoreを作成する関数なので、export defaultでexport先からStoreで参照できるようになります。
configureStoreには、createSliceで作成したreducerを登録します。
では、reducerを定義した./store/modules/counter.jsを覗いてみましょう。
./store/modules/counter.js
import { createSlice } from "@reduxjs/toolkit";

const counter = createSlice({
  name: "counter",
  initialState: 0,
  reducers: {
    add(state,{type, payload}){
      return state + payload;
    },
    minus(state,{type, payload}){
      return state - payload;
    },
  }
});

const counter2 = createSlice({
  name: "counter2",
  initialState: 0,
  reducers: {
    add2(state,{type, payload}){
      return state + payload * 2;
    },
    minus2(state,{type, payload}){
      return state - payload * 2;
    },
  }
});

const { add, minus } = counter.actions;
const { add2, minus2 } = counter2.actions;

export { add, minus };
export { add2, minus2 };
export {counter, counter2};
// export default counter.reducer;
reducerを定義するのには、createSlice関数を使います。
複数のreducerを使いたいときは、必要なreducer分だけcreateSlice関数で、reducerを作成します。
そして、reducer名とアクションを外部から使用できるようにexportします。
繰り返しになりますが、reducer名はindex.jsで参照して、アクション名はそのアクションが必要なコンポーネントで参照します。
reducer内の処理の説明
const counter = createSlice({
  name: "counter",
  initialState: 0,
  reducers: {
    add(state,{type, payload}){
      return state + payload;
    },
    minus(state,{type, payload}){
      return state - payload;
    },
  }
});
./store/modules/counter.jsには、「counter」と「counter2」という2つのreducerが定義されています。
内容はほぼ同じで、「counter」は入力のpayload分だけ、+-して、「counter2」は入力のpayloadを2倍にして+-します。
stateの初期値は、”0″としています。
./components/Counter.js コンポーネント
import CounterResult from "./CounterResult";
import CounterButton from "./CounterButton";

const Counter = () => {
  return (
    <>
      <h2>カウントアップダウン</h2>
      <CounterResult />
      <CounterButton step={2} calcType="+" />
      <CounterButton step={2} calcType="-" />
      <CounterButton step={10} calcType="+" />
      <CounterButton step={10} calcType="-" />
    </>
  );
};
export default Counter;
「./components/Counter.js コンポーネント」は、Redux Toolkitを使用するコンポーネントを呼び出すコンポーネントです。
<CounterButton>コンポーネントに数値と+か-のボタンのどちらを出すかを指示しています。
./components/CounterResult.jsコンポーネント(reducerのstateの値を求める)
import { useSelector } from "react-redux"
const CounterResult = () => {
  const counters = useSelector(state => state);
  return <h3>{counters.counter}:{counters.counter2}</h3>;
};

export default CounterResult;
./components/CounterResult.jsは、./store/modules/counter.jsで定義したreducerに対応したstateの値を表示するコンポーネント。
初期値は”0″で「+2」ボタンを押せば、右のカウンターは+2、左のカウンターは+4されるようになっています。
stateの値は、useSelector()によって求めることができます。
useSelecor()のコールバック関数の引数がstateになります。
stateの中身は以下のようになります。
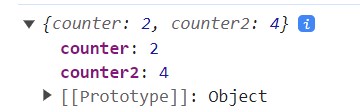
二つのreducerのstateのがセットされています。
それぞれ、「state.counter」「state.counter2」で値を取り出すことができます。
./components/CounterButton.jsコンポーネント(reducerのstateの値をセットする)
import { useDispatch } from "react-redux";
import { add, minus, add2, minus2 } from "../store/modules/counter"

const CounterButton = ({calcType, step}) => {

    const dispatch = useDispatch();

    const clickHandler = () => {
        const action = calcType === '+' ? add(step) : minus(step);
        const action2 = calcType === '+' ? add2(step) : minus2(step);
        dispatch(action);
        dispatch(action2);
    }

    return <button onClick={clickHandler}>{calcType}{step}</button>
}
export default CounterButton;
./components/CounterButton.jsコンポーネントでは、カウンターの+-をするためのreducerをコールします。
reducerは、useDispatch()で求めます。
そして、アクションを指定することによって、reducerのどのアクションで、処理を行うかを指示できます。
それが、
    const clickHandler = () => {
        const action = calcType === '+' ? add(step) : minus(step);
        const action2 = calcType === '+' ? add2(step) : minus2(step);
        dispatch(action);
        dispatch(action2);
    }
ボタンが、”+”なら、add()とadd2()をアクションに設定して、ボタンが”-“なら、minus()とminus2()をアクションに設定してdispath()をコールしています。
これによって、それぞれのreducerが動作して、./store/modules/counter.jsでカウンターが更新されます。
最後に
reactやreduxって状態管理の多くをライブラリがやってくれるので、覚えちゃうとコード量も少なくてすんで、すごく便利。
でも、ブラックボックスの部分が多いので、処理の流れがブツブツと切れているような感じで、今一つすっきりしないところがあると感じました。
この記事を書くことによって、Reduxの流れが身についた感じですね。
もしReduxを理解することにおいて記事が役に立ったら嬉しく思います。
このブログに掲載されているコードは、著作権者(私)に帰属します。コードを自由に使用、複製、改変、配布、販売、サブライセンスできます。また、コードを使用した結果、何らかの損害が発生した場合でも、著作権者は一切責任を負いません。